Convert PDF to Word
To begin converting PDF files to Word documents (DOCX format), click PDF to Word from the main navigation menu. With the built-in batch conversion capability, it is easy to convert multiple PDF files to Word documents all at once. The conversion process involves three simple steps:
Step 1: Add Files
Click the Add File button at the top of the file list.
Browse and select the PDF files you want to convert.
Repeat to add multiple files as needed.
Step 2: Set Conversion Range
For each file, choose to convert the entire PDF or specify a page range.
To convert specific pages, enter the start and end page numbers in the Pages to Convert column.
Ensure that the selected range falls within the total page count of the file.
Step 3: Convert Files
Click the Convert button to start the conversion process.
The app processes each file one at a time, displaying progress and status updates in real time.
After Conversion
Open the output file: Click the folder icon
 next to a file entry to open the output folder in File Explorer.
Remove a file from the list: Click the minus icon
 next to a file entry. This removes the entry from the list but does not delete any files.
Clear all entries: Click the Remove All button above the list to clear all file entries from the conversion queue.
Convert Word to PDF
To begin converting Word documents to PDF files, click Word to PDF from the main navigation menu. With the built-in batch conversion capability, it is easy to convert multiple Word documents to PDF files all at once. The conversion process involves just two steps:
Step 1: Add Files
Click the Add File button at the top of the file list.
Browse and select the Word files you want to convert.
Repeat to add multiple files as needed.
Step 2: Convert Files
Click the Convert button to start the conversion process.
The app processes each file one at a time, displaying progress and status updates in real time.
After Conversion
Open the output file: Click the folder icon
next to a file entry to open the output folder in File Explorer.Remove a file from the list: Click the minus icon
next to a file entry. This removes the entry from the list but does not delete any files.Clear all entries: Click the Remove All button above the list to clear all file entries from the conversion queue.
Conversion Options
To change where converted files are saved, click the Options button at the top right of the app interface. In the Options panel, you can choose the output folder for converted files:
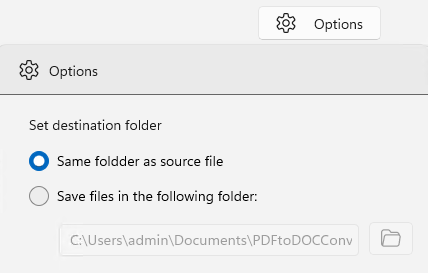
Set Destination Folder
Same folder as source file
Select this option to save the converted file in the same location as the original input file. This is the default setting.Save files in the following folder
Choose this option to define a custom folder for all output files. Click the folder icon to browse and select the destination directory. The selected folder path will be displayed in the box below.
Use this setting to organize your converted files more efficiently or direct them to a specific working folder.